


Balm - Makes the tattoo last at least 6-8 days longer
Balm - Makes the tattoo last at least 6-8 days longer
 Makes the tattoo last 3-4 days longer
Makes the tattoo look even more real
Couldn't load pickup availability
- American express payment method
- Apple pay payment method
- Bancontact payment method
- Google pay payment method
- Master payment method
- Paypal payment method
- Visa payment method

Balm - Makes the tattoo last at least 6-8 days longer
Our balm makes a tattoo last at least 6-8 days longer and still look more realistic than usual. So no more 1-2 weeks, but 3-4 weeks.
Nourishing Tattoo Balm with 70 g / 2.47 oz content and a pleasant coconut and vanilla scent. Moisturizes the skin and makes temporary tattoos appear fresher, clearer, and more vibrant. Only apply once your tattoo has fully darkened – ideally after approx. 24–48 hours.
Information
Information
Tattoo Balm – Care & Glow for your temporary tattoos
Make your tattoo experience even more intense: Our Tattoo Balm was developed to care for your skin and make your temporary tattoo appear visually fresher, clearer, and more vibrant.
The balm contains 70 g / 2.47 oz of product and is perfect as a care product after your tattoo has fully developed.
The creamy texture moisturizes the skin and helps reduce dry areas, making your tattoo look more even and well-cared for. The pleasant coconut and vanilla scent also provides a high-quality care experience after application.
Important: Only apply the Tattoo Balm once your temporary tattoo has fully darkened. The tattoo develops over several hours after application and only becomes really dark after approx. 24–48 hours. Before this, no balm, cream, or oil should be applied to the area so that the design can develop optimally.
Why you'll love the Tattoo Balm:
The balm visually enhances your tattoo and provides a well-groomed, natural glow. Especially with dark tattoo designs, skin care can help make the design appear clearer and more intense.
Ideal for anyone who wants to get the most out of their temporary tattoo – whether for everyday wear, content creation, events, festivals, or as a realistic test before a real tattoo.
Benefits at a glance:
70 g / 2.47 oz content
Moisturizing care for the skin
Makes temporary tattoos appear fresher and more vibrant
With a pleasant coconut and vanilla scent
Only apply after the tattoo has fully darkened
Ideal for new and existing tattoo designs
Perfect as an additional product for your tattoo set
Easy to apply and pleasant on the skin
Application:
Wait until your temporary tattoo has fully darkened. This usually takes approx. 24–48 hours. Then, carefully apply a small amount of the balm to the skin around the tattoo or lightly over the tattoo and gently massage it in.
Please do not use immediately after applying the tattoo. During the development phase, the tattoo should not be rubbed, washed, or touched excessively.
Who is the Tattoo Balm suitable for?
For everyone who wants their temporary tattoos to look well-groomed, fresh, and more intense, and who values a realistic, clean finish. Particularly suitable for our designs from Kurd Art Collective, if you want to combine an intense tattoo look with well-cared-for skin.
More care. More glow. More tattoo effect.
With the Tattoo Balm, you'll visually get more out of your temporary tattoo while giving your skin the care it deserves.
What is a KAC tattoo?
What is a KAC tattoo?
A KAC Tattoo is an ultra-realistic temporary tattoo that lasts 1–2 weeks.
How it works:
- Initially, the tattoo is transparent and develops into a dark blue/black color within 24–48 hours.
- It gradually fades as your skin naturally renews itself.
- Looks like a real tattoo.
The longevity of your tattoo depends on its size, placement, application, and your daily activity.
FAQ – Frequently Asked Questions
FAQ – Frequently Asked Questions
Are your tattoos vegan?
Yes. Our temporary tattoos are 100% vegan and contain no animal-derived ingredients.
Do you test on animals?
No. Our products are cruelty-free and are not tested on animals at any stage of development or production.
What are the tattoos made of?
They are made of cosmetically approved pigments, a polymer-based transfer layer, and skin-friendly, water-based components designed for temporary application on the skin.
How long do the tattoos last?
Under normal conditions, they last between 10 and 16 days. Durability depends on skin type, placement, friction, and daily activities.
Are the tattoos permanent?
No. They are temporary and fade naturally as the skin renews itself.
Do the tattoos go under the skin?
The color generally remains on the skin surface. With strong friction or intense rubbing, small amounts of pigment can penetrate slightly deeper, which may shorten durability.
Are the tattoos waterproof?
They are water-resistant, meaning normal washing is not a problem. However, prolonged soaking, aggressive scrubbing, or intense rubbing can reduce their durability.
Can I shower with them?
Yes. Showering is perfectly fine once the tattoo is fully developed. However, avoid aggressive exfoliation or strong scrubbing.
Is the tattoo suitable for sensitive skin?
Our tattoos are made from skin-friendly materials. For very sensitive skin or allergies, we still recommend performing a patch test beforehand.
Does application hurt?
No. Application is completely pain-free and does not involve needles.
Can I remove the tattoo earlier?
Yes. Increased friction, exfoliation, or oil-based products can make the tattoo fade faster.
Is the tattoo suitable for Wudu or ablutions?
The tattoo lies on the skin surface and is water-resistant, but it does not completely block it. For personal religious assurance, we recommend consulting a qualified scholar.
Are the pigments cosmetically approved?
Yes. All pigments used are approved for cosmetic applications and intended for skin contact.
Can I apply the tattoo anywhere on my body?
Most body areas are suitable. However, areas with high friction (hands, feet, joints) may cause the tattoo to fade faster.
Is the product safe for daily use?
Yes. When applied correctly, the tattoos are designed for daily use.
If you have further questions, please feel free to contact our support team at any time.

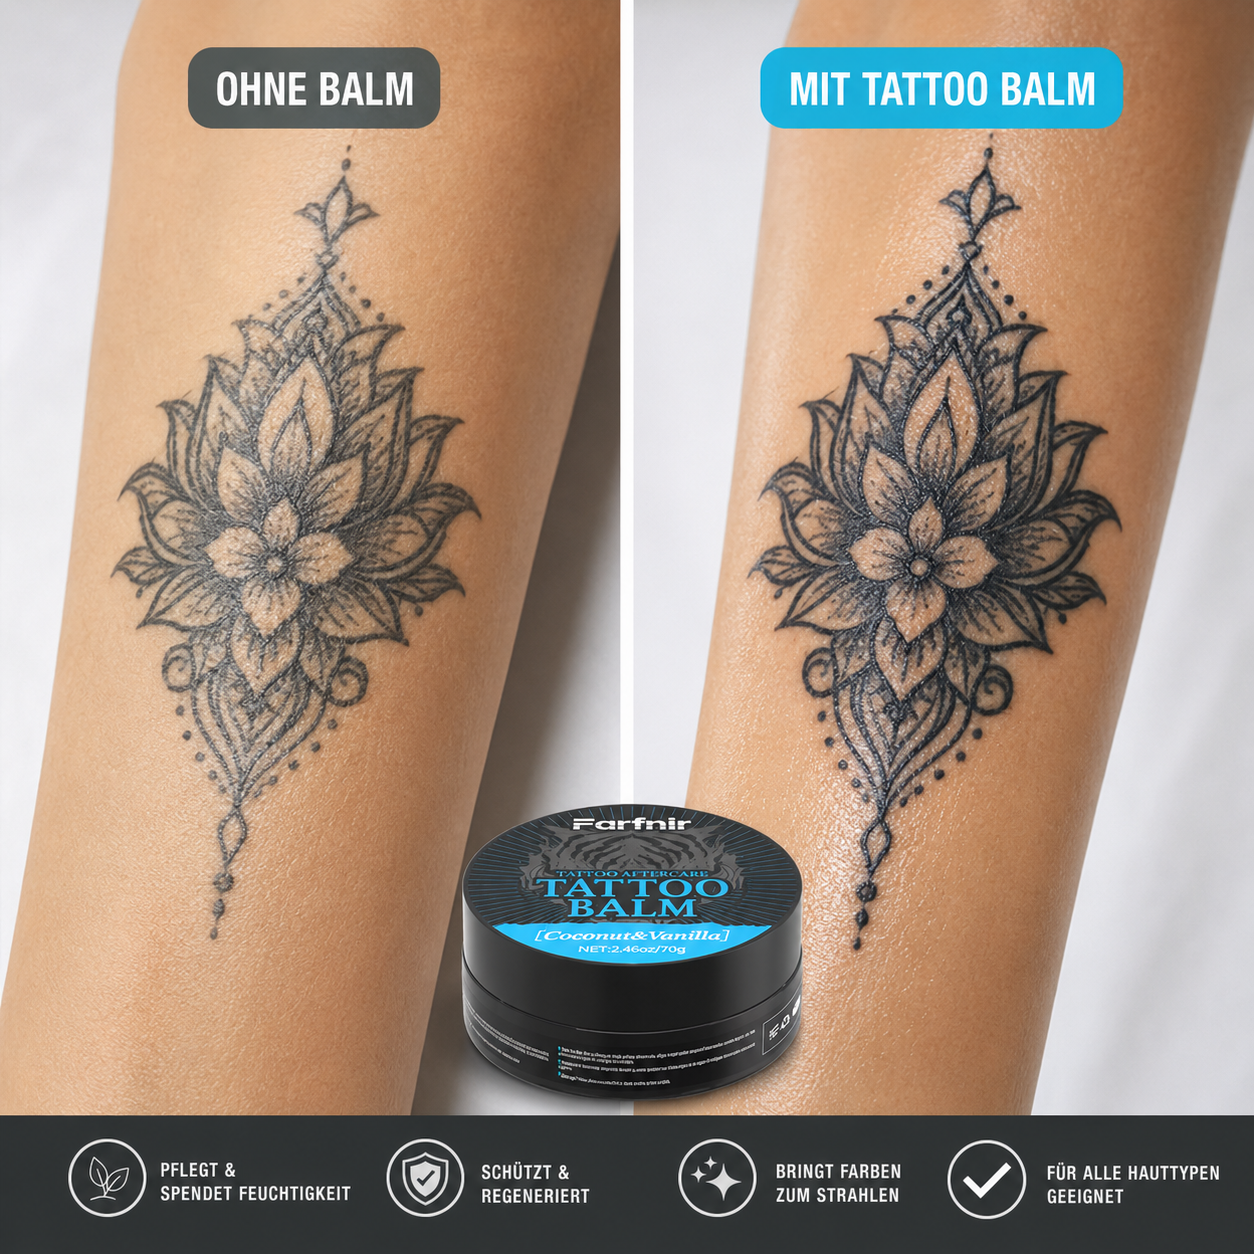

Before & After – The difference is visible
Your temporary tattoo looks best when your skin is also well-cared for. Dry skin can make the tattoo appear paler and less clear. With the Tattoo Balm, the skin receives moisture and a nourished glow, making the design appear visually darker, clearer, and fresher.
Without Balm:
The tattoo may appear drier, duller, and less intense.
With Tattoo Balm:
The tattoo appears more nourished, shinier, and visually more vibrant.
Important: Apply the balm only after your tattoo has fully darkened. Full development usually takes about 24–48 hours. During this time, you should not apply any cream, oil, or balm to the area.
More care. More glow. More tattoo effect.
Over 500,000 tattoos worldwide
My tattoo immediately looked fresher
I only used the balm after my tattoo was completely dark. After that, it looked much more nourished and vibrant. The skin had a slight glow and the tattoo appeared even clearer.
Smells really good and feels high quality
The coconut-vanilla scent is very pleasant and not too strong. The cream absorbs well and leaves the skin soft. Perfect if you want to care for your tattoo after darkening.
Visually, it really makes a difference
Without the balm, my tattoo looked a bit drier. With the balm, the skin was much better cared for, and the tattoo appeared darker and cleaner. I would definitely order it again.
Not a must-have, but a really nice addition
The tattoo works fine without balm, of course, but with the care, it just looks better. Especially after 2 days, when it's completely dark, the balm makes the look much fresher.
Perfect after 48 hours
I waited until my tattoo had completely darkened, and then I used the balm. Afterwards, my skin was no longer dry and the tattoo had a really nice, well-cared-for look.
Good complementary care for temporary tattoos
I just wanted my tattoo to look fresh longer. The balm moisturizes, smells good, and makes the design appear more vibrant. It's a perfect match for KAC tattoos.
REAL CUSTOMER VIDEOS/IMAGES
10 Gründe, warum sie begeistern
Sieh zuerst den Unterschied, bevor du dich dauerhaft entscheidest.
Vorher wirkt der Look clean und zurückhaltend. Nachher entsteht ein sichtbarer Tattoo-Effekt, den du im Alltag testen kannst – ohne Nadel, ohne Blut und ohne ein echtes Tattoo später zu bereuen.


SEE IT IN ACTION
Instructions:
Step 1 – Preparation & Cleaning
For best results, we recommend trimming or shaving the hair in the area before application. Apply the tattoo to clean, shaved or trimmed, and lightly moisturized skin. Then clean the area for 30 seconds with the primer wipe and let it dry completely.
Step 2 – Remove Protective Film
Carefully peel off the transparent protective film from the tattoo. Avoid touching the printed areas.
Step 3 – Place Tattoo
Place the tattoo with the adhesive side down on the desired skin area. Position it carefully and correct its position if necessary before moistening it.
Step 4 – Moisten Tattoo
Press evenly and with light pressure on the tattoo with a damp cloth for 30–60 seconds until it is completely wet. Gently lift a corner to check if the entire design is sufficiently wet.
Step 5 – Remove Paper
Slowly and carefully peel off the backing paper. Make sure that all parts of the tattoo adhere to the skin.
Step 6 – KAC is Applied
Your tattoo is now applied. It will initially appear light and will gradually darken over the next 48–72 hours.